When you see unexpected things on your machine the first thing you think is that your system is infected. The second thing is probably: “why my antivirus/antispyware/antiwhatever hasn’t recognized the problem?”. Maybe it’s not a virus; it’s just your OS that is not working well. So the best thing to do is to check manually your system and find and destroy anything unwanted.
Manual Removal
If your antivirus/antispyware/antimalware is not able to help, you’ll have to manually take care of the issue.
One advice: during this manual procedure do not open any drive through “My Computer”, as sometimes the viruses use the “Autorun” function to launch nasty processes…
1. Kill the processes
In order to complete the instructions below:
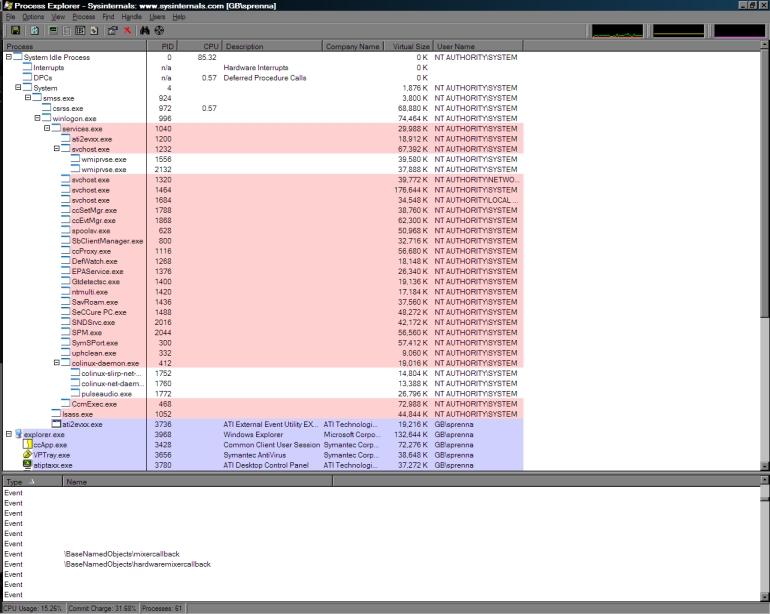
Red: Process that has terminated or killed.
Pink: One of the Windows’ services. These services are used by the Operating System to control and manage most of its internal parts (i.e. control network functions, enable bluetooth usage, control and make sound system available, etc.). These services don’t interact with the users and are launched by the operating system itself.
Light Blue: standard executables which are running with the same user account as the process explorer.
Violet: these executable are internally encrypted, packed or both. Most Trojans, viruses and malware uses this kind of protection. When a software executable is encrypted or packed, is more difficult to obtain access to its content. This means that an anti virus can easily detect one of these files as malware just because it’s in this state. There are software that are encrypted as a way to protect their algorithms from being easily studies or stolen (Skype is a good example).
Grey: when you suspend/pause a process you will see it in grey. Process Explorer can be used to suspend a process. This is very useful when you have two processes that are checking each other’s status. If you kill one of them, the other will notice that and it will start the killed process again. If you suspend one, you can kill the other and then kill the suspended one.
You can configure these highlighters with higher details by going into the “Options” menu and choose “Configure highlighting”

ProceXP Highlighting

ProceXP
As you can see we can easily identify some processes:
- PROCEXP.EXE is Process Explorer’s own process
- OUTLOOK.EXE is Outlook’s process
- IEXPLORE.exe is Internet Explorer
- Communicator.exe is Microsoft Office Communicator’s process
Anyway you cannot know all the existing processes that can exist in the world. That’s why there are some websites like http://www.processlibrary.com/ or http://www.what-process.com/ or http://exelib.com/ that are basically search engines for processes. They are useful as they can tell you if an unknown process is a virus or a legitimate one.
Anyway is not only important to recognize each file, but even where is located or which process has launched it. For example, winlogon.exe is part of Windows OS; it manages the login and logout procedures on the system. Anyway, it standard location is under smss.exe (Session Manager Subsystem, responsible for handling sessions on your pc) as it’s launched by it, but if you see under “explorer.exe” for instance, you can safely assume that you’ve got an infection on your machine. One of the key indicators about a possible “fake process” like winlogon.exe under explorer.exe is the CPU usage that could be too high for example. Another good tip to spot something wrong is when you can see that a specific process is launching other processes with strange names (like xktrtksad.exe).
Another good and easy way to find a malware is to see where its process is located or how is called. If you leave the mouse pointer on a process (in the screenshot I’ve left the pointer on OUTLOOK.EXE) you will see a popup that will tell you where the file is located (you can see this by right click on the process and choose properties as well, but it’s quite slow).

ProceXP Process Location
If we see that the process is not where is supposed to be (for example if you see a system file like winlogon.exe in another folder than c:windowssystem32, you are looking at a virus/malware.
Sometimes there are no safe bets on this; you’ll have to start killing processes, until the wrong/strange behavior you are seeing is not observed anymore. You may notice that one of the processes you’ve killed is restarted by some other process. This is a clear sign of something wrong that you should investigate online (by searching for both the restarted process and its originator).
2. Delete the virus
Now that you’ve identified the offending process we have to get rid of it. Right click on it and then choose Properties. In the “Path:” field copy the path, then go to Start -> Run and paste the path there. Remove the filename (for instance if you have pasted “c:windowsnotepad.exe” please leaves “c:windows” in the Run field) and press Enter. Explorer will open on the folder that contains the “bad” process.

ProceXP Process Info
Now terminate the undesired process in process explorer by right clicking on it and choosing “Kill process”.
If the same process starts again, select the process which is launching the virus as it must be part of it and right click on it to see its properties and where is located. If the main process is identified as a virus by a quick check on Google/Process identification websites, copy its path in the Run field as we did in the previous step and open its folder.
Now you have two options on the plate:
- Suspend the process by right clicking on it and click suspend on the menu. You should be able to kill the process which is launching the child one. Then, you should be able to kill the suspended process once for all.
- Select the main process, right click on it and choose “Kill process tree”. This function will kill the process selected and all the sub processes.
If you don’t seem to have enough rights to kill a process, there is a chance that is heavily linked with your working system, so the only option is to start your Windows in Safe mode (by pressing F8 before Windows starts) and do again the previous steps.
In the explorer’s folders you’ve opened following the previous steps you should now be able to locate the file or files that should now be deleted.If you cannot find the file it must be hidden.
NOTE: if one of the viruses seems to be originated by explorer.exe, you will not have to delete it (please don’t!), but this means that explorer.exe is now loading an external (viral) DLL that is modifying its behavior.
In order to recognize the culprit you’ll have to use another function of Process Explorer:
- Right click on the explorer.exe and choose “Properties”.
- This time you’ll have to open the tab called: “Threads”.
- Here you will see a list of DLLs that are currently used by explorer.exe.
- As you can probably imagine, now you’ll have to search for some suspicious name there, or use Google to identify those DLLs until you find the one (or more than one) that is causing the issue.
If the files you are supposed to see are not visible, they are probably hidden. In order to see them, open “My Computer”, click on “Tools”, choose “Folder Options”, click on the tab “View”, in the “Advanced settings” you’ll have to tick “Show hidden files and folders” and untick “Hide protected operating system files (Recommended)”.
If after enabling the view of all files you are still not able to find the one/ones you are looking for, there is a chance that the virus is infecting explorer.exe and is disabling the “show hidden files” function.
A good workaround to this issue is use a software like 7-Zip (http://www.7-zip.org/) that is not only a compression/decompression software, but it can be used as File Manager as well.
7-Zip displays hidden files by default, so you can use it to navigate to the desired folder where you’ll be able to see ALL the files and be able to delete anything you need to remove.
Now it’s a good time to double check the root of every drive to find hidden files.

7-ZIP
First of all, you are not supposed to see .inf files and most of all an Autorun.inf file. The Autorun.inf is the file that establishes a non standard icon to a drive and automatically starts a software when you double click on the drive’s icon (for example, think about a CD that contains a game or program and when you double click on its icon the setup/installation starts automatically).
Please note that the following files are system files and should exist on the root of your C drive (and you should’n delete them):
AUTOEXEC.BAT
boot.ini
Bootmgr.config
Hiberfil.sys
NTDETECT.COM
CONFIG.SYS
IO.SYS
MSDOS.SYS
NTDETECT.COM
ntldr
pagefile.sys
Any other .exe file is probably something not good, but remember to always check on the Internet before deleting something you don’t know.
3. Cleaning up
Once the files have been removed, you have to remove the registry entries that used to launch them. For this task we’ll use Autoruns. Open it by typing %userprofile%Desktopautoruns.exe in the Run Dialogue. Wait while refreshing completes.
Let’s hide Microsoft legit processes from our view by clicking on “Options” and then select “Hide Microsoft Entries and Windows Entries”. You’ll have to refresh the view by clicking on the “Refresh” button or by pressing “F5”or by closing and reopening the program.

Autoruns
Once the scan is complete, select the “Logon” tab and check all the entries to see if you can identify anything wrong. Please note that in the first column you see the “Autorun Entry” that is a name associated to the entry, while in the column “Image Path” you will see the executable. If you are not sure if an entry should be there or not, search on the web using Google or one of the “processes identification” sites listed previously.
4. Revert changes done in the registry
Here you have a list of possible functions that many Trojans like to disable and that you can easily restore following below instructions:
Re-Enable Registry Editor:
- If the Regedit has been disabled by an Administrator there is nothing to do, talk to the administrator (this means that you are using a corporate machine that has been joined to a domain).
- The registry editor can be disabled in policy editor by a virus. To re-enable it, type gpedit.msc in Start -> Run field and press enter. Click on Administrative Templates, then on System and then locate “Prevent access to registry editing tools” and double click on it.: Select the enabled on the button and press Apply. Now we’ve created a policy that disables the Registry Editor. Now select disabled on the button and then press Apply and then the “OK” button. Now the policy will be disabled making the Registry editing tools available for the users (again).
Enable Task Manager:
There are a few ways to accomplish this:
Method #1:
Click Start -> Run and type in the run field: REG add HKCUSoftwareMicrosoftWindowsCurrentVersionPoliciesSystem /v DisableTaskMgr /t REG_DWORD /d 0 /f
Method #2 (that is the manual version of Method #1):
Click Start -> Run and type Regedit.exe
Press enter and the Registry editor will open
Navigate to the following branch:
HKEY_CURRENT_USERSoftwareMicrosoftWindowsCurrentVersionPoliciesSystem
Now if you look at the right-pane you should be able to see the value DisableTaskMgr. Delete it and close the Registry Editor. You’re done!
Method #3:
Click Start -> Run and type gpedit.msc and press Enter.
Navigate until you reach the branch:
User Configuration/Administrative Templates/System/Ctrl+Alt+Delete Options/Remove Task Manager
Double-click on the Remove Task Manager option and set the policy to Not Configured.
Enable Command Prompt:
Open Start -> Run and type:
REG add HKCUSoftwarePoliciesMicrosoftWindowsSystem /v DisableCMD /t REG_DWORD /d 0 /f
Then press enter and you’ve done!
Restore opening Drives using double click under “My Computer”:
This has been covered in the Part #2 when talking about the Autorun.inf part.
Restore Show Hidden Files function:
Go to Start -> Run and type regedit in the run field and then click Enter.
The Registry Editor will open and you’ll have to navigate to the following key:
HKEY_LOCAL_MACHINESoftwareMicrosoftWindowsCurrent VersionExplorerAdvancedFolderHiddenSHOWALL
In the right pane you should see the value CheckedValue that you’ll have to delete (it should be a REG_SZ type and data should be 2 or 0).
Once the value is deleted, create a new DWORD value called CheckedValue (same as above, except that the type is REG_DWORD).
The value data has to be 1 (0×00000001).
The hidden files function is enabled again!
Restore Folder Options:
Go to Start -> Run and in the run field type regedit and press Enter.
The Registry Editor will open and you’ll have to navigate to the following key:
HKEY_CURRENT_USERSoftwareMicrosoftWindowsCurrentVersionPoliciesExplorer
In the right pane you should see the value NoFolderOptions. Right click on it and choose the option Modify. Set the value data field as 0 (zero) and press OK. Close Registry Editor and reboot the pc. The folder options will work again.
Now that you have various information on how to clean your system from infections it’s time to wish you… Good Luck!


 Please support us by using Babylon search engine


Recent Comments