• Migrate between Ubuntu distro or change desktop environment?

    One of the most visible changes (but not the only one!) between different Ubuntu distro is the Desktop Environment.

    Looking at the official information page about Ubuntu derivatives we can see many distributions like Lubuntu, Kubuntu, Xubuntu and so on, all officially maintained by Canonical.

    The beauty of any linux distro is that you can customize it as you want. Ubuntu is shipped with Unity desktop environment, however if you want to test (or remove) another environment, it’s quite easy:

    Install Ubuntu Unity:
    sudo apt-get install ubuntu-desktop

    Remove Ubuntu Unity:
    sudo apt-get purge ubuntu-desktop

    Install LUbuntu LXDE:
    sudo apt-get install lubuntu-desktop

    Remove LUbuntu LXDE:
    sudo apt-get purge lubuntu-desktop

    Install Ubuntu GNOME:
    sudo apt-get install ubuntu-gnome-desktop

    Remove Ubuntu GNOME:
    sudo apt-get purge ubuntu-gnome-desktop

    Install KUbuntu KDE:
    sudo apt-get install kubuntu-desktop

    Remove KUbuntu KDE:
    sudo apt-get purge kubuntu-desktop

    Install XUbuntu XFCE:
    sudo apt-get install xubuntu-desktop

    Remove XUbuntu XFCE:
    sudo apt-get purge xubuntu-desktop

    Remember that when you install a desktop environment you normally install extra software like games, accessories, etc, therefore once you have removed one using the “purge” option, you can then run:

    sudo apt-get autoremove --purge
    To clean up all the extra software. This is because the extra software is not uninstalled when you uninstall the main environment.

    Another option is to skip the installation of extra software by slightly tweaking the command. For example to install KUbuntu KDE environment just add –no-install-recommends as shown below:

    sudo apt-get install --no-install-recommends kubuntu-desktop

    Finally I have noticed that even if you remove completely the desktop environment associated to your distribution (for example you remove Unity from Ubuntu) leaving another one installed, as soon as a new version of the distribution is available, the original desktop environment is installed and set as default again. Therefore I’ve learned that the best way to migrate your Ubuntu distribution to another distribution is to download and burn the ISO of the next version (or even the same version!) and launch the installer.

    LUbuntu installation screen

    LUbuntu installation screen

    As you can see from the screenshot, by using this method you can migrate your distribution to another, without worrying about losing your settings or reverting back to the original one.

  • Back from the past: ASCII MOVIES

    Today I’ve found in my bookmarks a few links about an old passion shared between many IT enthusiasts in the 80s: ASCII Art.

    Small pieces of art, ancient mosaics created with letters, numbers and characters from the future.

    One of the latest evolutions of this art has been the creation of animations first and entire movies. Finally we’ve seen software able to transform digital video output into ASCII animations, videogames graphic routed to ASCII terminals and the popular video player VLC to add a video plugin to reproduce videos in ASCII (with the option to see them in color).

    While many of you may remember such links, I want to share them (or at least the ones still living on the internet) to share some nostalgic memories or surprising evidences of a mysterious past…

    First of all one of the biggest classics: Star Wars

    Then Matrix

    Some good Classic Rock Videoclip

    and finally one of my favourites, Music Videos in ASCII which singer is a C64 digitized voice

    There are various other sites, however if you would like to see how a specific movie/video would look like, you can always use our favourite player, VLC, Go to VLC menu -> Preferences -> Choose “Video” -> “Output Module” and select “Color ASCII art video output” for Colorized ASCII or “ASCII-art video output”.

    Open a video file and feel the difference!

  • How to create a simple network topology

    Today I’m going to explain a simple way to create a network topology for your home needs. The solution provided would probably good enough for small offices as well, while bigger networks will need professional solutions.

    The topology the we are going to draw are to be considered as references for small networks that are slowly increasing in size. For example a few years ago we generally saw one computer per house, maybe with a modem connection to the Internet, but today we have more than one PC, smartphones, tablets, laptops, media centers, TV and small servers all connected to the internet in small/big home network.

    Therefore I see more and more often people struggling to remember what is connected to what or even what is supposed to be stored where or which name or IP are assigned to what. Summarizing… A mess…

    So in my research to solution to this problem I’ve thought to try to use something freely available to many and simple to use: LibreOffice Draw.

    I thought as well that it would have been nice to be able to use those nice Cisco icons that you can find in products like Cisco Packet Tracer and I’ve surprisingly discovered that Cisco has made available those icons to everybody in many different formats.

    Thanks to this we can now start preparing our home-made network  topology:

    1.download and install Libreoffice from this link;

    2. download the Cisco icons in JPG format at this link and uncompress the file in a folder of your choice;

    3. run Libreoffice Draw;

    4. Choose the menu Tools -> Gallery

    5. Now we are going to create a specific Theme by clicking on the button New Theme (this will open a new window);

    6. In the new window we can put a nice title (ie. “Cisco”) and then we need to choose the tab called Files;

    7. Now we choose Find and go to the folder where we decompressed the Cisco icons and then choose the path with OK;

    8. All the icons will be imported (it will take a few seconds) and then you can confirm with OK;

    9. The icons have been imported  but now you will need to have the icons window and the editing window both visible. To do this move the theme bar to the left or right of the screen. In this way you will see the editing area and the icons visible.

    10. Now you can start adding icons to the main area and by double clicking on them you’ll be able to write a multiline description (like the hostname and the IP address).

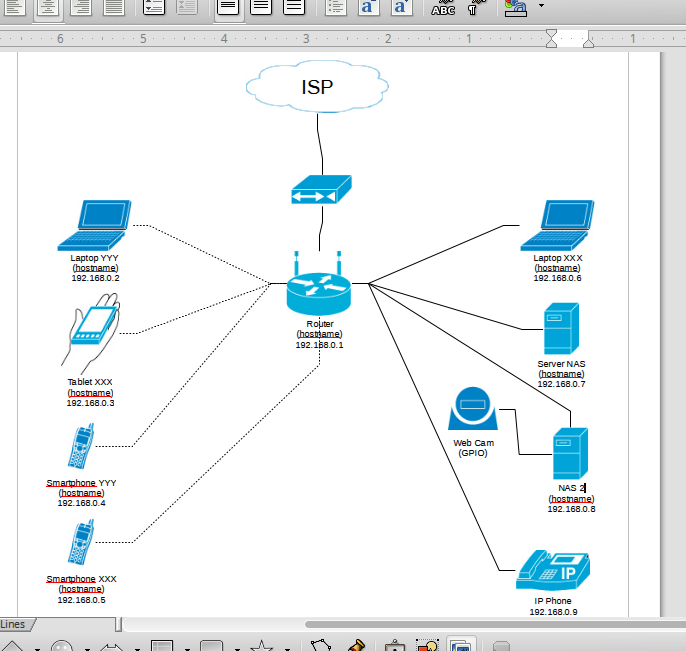
    See an example I’ve quickly drawn below:

    Sample Network Topology

    Sample Network Topology

    Now you can have all the information you want at hand and maybe do proper planning on your network for future expansion!


    UPDATE 30/07/2014: as commented by Mark Oellermann (see comments below), he has made available under a Creative Commons Attribute-ShareAlike V3 license which allows commercial and non-commercial use, modification and redistribution as long as the terms of the license are met. These are available at: http://www.vrt.com.au/downloads/vrt-network-equipment